Mick and I went on an Alaskan cruise last week.
drill 
The photo above was taken during the mandatory safety drill that happens after everyone is on the ship.

It was the second Alaskan cruise we’ve taken.  As far as cruises are concerned, Alaska is probably one of your better destinations.  The scenery is absolutely spectacular.

glacier

Plus, it’s kind of fun to be on the ship, especially if you pretend you’re on an episode of The Love Boat.  There’s plenty to eat and drink at all hours of the day, there’s a spa, and there’s fun things to do in the ports of call.
flight 

Still, after doing it twice, I can honestly say I have no need to do it again.  There are aspects of cruising that are a bit generic, for lack of a better term.  First of all, it is very shopping oriented, almost offensively so.  There is a “shopping advisor” on board whose job is to direct passengers to all the “good” shopping both at the ports of call and onboard the ship.  Most of this shopping is for jewelry, not for the cool handmade kind, but for stuff you can get in any jewelry store in any mall in the country.  Supposedly it’s cheaper, but it didn’t seem all that inexpensive to me.  Then there’s the art auctions, the two-for-$39.99 watches, the chain-sold-by-the-inch… so many opportunities to waste some cash.

Don’t get me wrong–there was never a consumer born who could out-consume me–it’s just that there’s only so much of that sort of thing that even I can take.

But lest you think I didn’t find anything to spend some money on, I did find a couple of very cool things to purchase.  In Juneau, there was an art gallery-type store than had some very cool handmade-in-Alaska things.  I got this gorgeous bowl that has a very pretty glaze on it–the entire collection was beautiful and I had a hard time picking just one piece:

juneau_bowl

Even more exciting, I happened upon a yarn store in Prince Rupert Island, Canada, where they had some lovely hand-dyed-in-Canada yarns:

canada_sock_yarn 
The multi-colored yarn is self-patterning, as you can see by this small swatch:

canada_sock_yarn_swatch
I couldn’t wait to get started on a pair of socks with this stuff, so I chose this Basic Ribbed Sock pattern and spent most of Saturday and Sunday happily knitting and watching Weeds on Video on Demand.

canada_sock_yarn_basicribsock
My plan is to make a lacy or cable pair of socks with the green wool, which I think will look marvelous.  I haven’t chosen the pattern yet, but here are a few options:

Baudelaire
More Fun Than Cables
Mirabella

I think I may have mentioned about 20 times that I attended the recent Police concert at Dodger’s Stadium in Los Angeles.  Aside from the two + hour drive from Santa Monica to Downtown and the churlish limo driver who wouldn’t move so we could get out of the parking lot at the end of the concert, it was a blast.

While there, of course I bought myself a t-shirt with the intention of making it into a tube top.  After finishing my Bada Bing! top though, I decided that rather than make the exact same thing with this t-shirt, I’d experiment a little.

I present to you, the Off-the-Shoulders-Sex-Pot top:

police_front

I am wearing a tank top under it, but I think I could pull off a strapless bra (spawns of Satan that they are) with it.

This top started out looking like this:

police_before
The first thing I did was add 1/8 inch elastic to the bottoms of the sleeves to make them kind of puffy.  It was an immediate improvement and completely feminized the top.

The next thing I did was cut the neck and shoulders off the top of the shirt.  This step was kind of a leap of faith.  I knew the look I was for but I didn’t have 100% confidence that it would turn out the way I envisioned it.

After cutting, I sewed about a 1/2 inch hem.  Next, I measured roughly enough elastic to go around my shoulders and arms and I sewed at the bottom of my hem so that there would be a slight "ruffle" at the top and none of the white elastic would show.

police_back

At this point, I had a top that I would’ve worn out of the house, but deep down inside I knew it wasn’t finished.  I let it sit a couple of days before deciding on what type of finish I was going to give it.

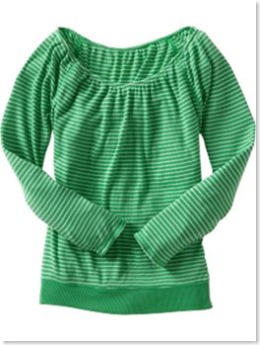
Originally, my plan was to keep the shirt longish and add a band to the bottom so that it would look kinda like this:

example_top
(picture from Old Navy.com)

My seamstress skills do not support doing something like this without a pattern, so I had to scrap that idea.  Thankfully, even after all the cutting I did in this mistaken attempt to add a band, I still had more than enough length in the body of the shirt to just add elastic around the bottom hem.  This provides (almost) the look I was going for with the band, and it was a whole lot easier to accomplish.

Someone asked me recently what my favorite Police song is and I’m not sure it’s possible to pick one.  Certainly, Every Breath You Take is a favorite.  Disappointingly, at the concert they played this as if they couldn’t wait for it (the song) to be over.  One got the feeling that if none of them ever heard or played this song again, they wouldn’t be sorry.

Back to trying to pick a favorite.  Impossible.  So I will pick three:

King of Pain
Message in a Bottle
Don’t Stand So Close to Me
Murder by Numbers

Okay, I lied, there are four.  (Actually, more than that, but I had to stop somewhere).

My time in the jewelry studio on Tuesday was spent making this ring:

aphrodite_ring_600

It reminds me of a jeweled crown, so I call it Aphrodite’s Crown.  I’ve never actually seen an image of Aphrodite wearing a crown, but let’s assume that if she did have one, this would be it.  The ring is hand-fabricated of 18k yellow gold with a natural citrine drop and a hammered set rhodolite garnet.

This is my second dangle ring.  The first, Moonlight Sonata, remains one of my favorites.  Of course I like this one too, but the drop is a little more cumbersome and that makes it less comfortable to wear.

On another note, yesterday I was talking to a friend about a painting by artist Julie Heffernan that he recently bought.  I’d never heard of her work but this morning I googled her and found some of her paintings online:

http://www.littlejohncontemporary.com/Heffernan/index.html

http://www.artnet.com/artist/8037/julie-heffernan.html

This stuff blows me away.  Suddenly, I’m inspired to paint something!

It’s possible that the title of this post makes no sense whatsoever.

18k_ruby_600

I will try to explain it by saying that this ring reminds me of Indian jewelry, which is generally 22 karat or higher and as a result, is a much richer gold color than the 14k jewelry you generally find in the United States.

So trying to think of a clever name for it, I thought of India, then Mumbai, then Bombay… I never did come up with a name for the ring, but hence the title of this post.

The ring is hand fabricated in 18k gold, with a bezel set ruby and two gold balls on either side of the bezel (which also reminds me of Indian jewelry).  It is a very simple little ring, and I’ve been wearing it stacked with my wedding band and a ring Mick bought me for Valentine’s Day.  (Okay, if you want to know the truth, I ordered the ring for myself and then told Mick he didn’t have to buy me a Valentine’s Day present).

Whenever I get kind of tired of making jewelry, as I did after the PAWSAPALOOZA event, I go back to making the more expensive stuff that takes longer to make and that I mostly keep for myself because I’d have to charge too much for both the materials and labor.  That’s always a problem with making hand-fabricated jewelry, at least for me, although many of the women in my studio have had varying levels of success selling their high end pieces.  Also, the harder I work on a piece, the less I want to give it up.

Going back to basics like this helps me rediscover why I love making jewelry so much and it feels more like an art than a production line.

The Sopranos might be over, but Tony will live on forever in my mind.  Especially since I fashioned this rad tube top from a big men’s t-shirt my brother sent me:

badabing_side
As mentioned in yesterday’s post, I used a pattern in the book Sew Subversive.  Since it’s their pattern and not mine, I won’t go into too many details, but this top is basically two rectangles hemmed and sewn at the sides with a band of elastic at the top.

The t-shirt started its life looking like this:

badabing_original
(photo courtesy of HBO.com)

My original idea was to put the "Bada Bing" front and center, but when I measured the fabric, putting it on the side was really the only way it would work.  I’m glad about that because I like it this way better.
badabing_front
The only real place I differed from the design in Sew Subversive is on the sides–I added slits about 5" up to make the top more roomy.

badabing_back
Since this was basically a practice run, I’m going to make the next one I do a bit larger in the midriff area and I’m also going to add straps so I can wear a bra.  With the Bada Bing top I’ll probably end up wearing a tank underneath it or use it as a swimsuit cover up.

I truly have let this blog lie dormant for far too long–I’ve been busy the past few weeks turning 39, getting a new computer, fulfilling my teenage dream of seeing the Police in concert… what else?  Oh, and of course I’ve been knitting and making jewelry.  I’ve just been too occupied to blog any of it.

Today, however, I finished a project I had high hopes for.  To some extent, the hopes weren’t dashed–this halter top turned out precisely how I wanted it to.  Hence, the good news:

halter_600
This design is from Speed Knitting–24 Quick and Easy Projects by Kris Percival. 

I knew going into this project that there might be a problem with fit.  I’ve lost some weight in the last couple of years, but I’m still fairly large up on top and halter tops, much as I love them, don’t generally offer enough support to be flattering on me.

To address this issue, I decided I’d put some short rows in each cup to give some additional room in the bust.  This has previously been a technique I didn’t really "get," but one of my WIPs is the Scarlett Woman tank top by Jennifer Tallapaneni at PieKnits.  I chose this project specifically because of the short row shaping in the bust and because it is "bra-friendly."  I’m almost finished with it, and I’ll definitely blog it when I’m done, but I mention it now because just as I’d hoped, it did a great job of explaining short rows as they apply to bust shaping.

After completing this halter top, I tried it on and knew immediately that there was no way it was gonna be supportive enough to actually wear out of the house.  It looked rather ridiculous, actually.

Nobody panic!  I had purchased a sew-in bra for another knit project that I never completed, so I decided to try it here.  I pinned the bra in then sewed it, using a simple running stitch.

halter_bra

Now for the bad news:

It still doesn’t fit!  I guess it’s time to panic.

I could probably get away with it, but it would be a stretch–literally.  So what’s a girl to do?  Give it to a smaller friend, I guess.

It might just be time to admit that I need some industrial strength undergarments to keep these girls under control and a skimpy knit halter top just doesn’t fit the bill.

I have to look at this as a learning experience (I’ve been having a lot of those lately).  Aside from the fact that this top, regardless of the size knitted, probably shouldn’t be worn by anyone larger than a C-cup, I think I could’ve chosen a better yarn.  The yarn I used is a "suede" tape and it’s too stretchy for this project.

But I’m really happy I modified the design and it actually came out the way it was supposed to.  It was worth it for that alone!

Okay, I know it’s been awhile since I’ve posted.  I just haven’t been in the mood.  I think that’s all gonna change in the next few days though.

First of all, the Summer issue of Knitty came out last week.  Hooray!  Here’s what I’d like to knit:

Coachella – This sexy top is begging to be knit.  And so I shall.

Zinzin – Another sexy top, with strategically placed ribbons to hide a bra backstrap.  It’s a win-win.

Askew – This top also appears to be bra-strap friendly, so I might give it a try.  I looks like it will flatter a buxom girl like me.

Sophie – This design tempts me, but it’s unlikely I’ll get around to knitting it.  I do like an unusual design though, so who knows.

I am kind of sick of jewelry at the moment.  Time to talk about painting or knitting for awhile.

I was looking through my photos and I came across some pictures of some of my older work–some of which are long since sold and I’d forgotten all about them.  Let’s take a walk down memory lane, shall we?

The painting above is of my friend Theresa’s dog, Ling.  It was, I think, the third portrait I’d ever painted and it remains probably my best work to date.


This painting, called Stuart Dreams of Peace is another favorite.  It was donated to PAWS/LA for their annual Pet Art auction a few years ago.  The unfortunate part of the story is that about a year ago I got an email from the woman who purchased it, saying she loved it and was so happy she bought it.  But she referred to it as Kramer Dreams of Peace.  I wrote back and thanked her, then said it was actually called Stuart Dreams of Peace, and that PAWS/LA must’ve made a mistake when they labled the art at the auction.  She replied that the title was actually written on the canvas in back of the painting (which is something I routinely do), which means I’m the one who made the mistake.  Oops.  Well, they look a lot alike–I guess sometimes I can’t even tell them apart.


Can you tell these dogs apart?

The painting below is called The Walk and it hangs in my living room. 


Finally, the photo below was taken the first year we got Stuart, around 2001.  He was a cuddle bug then, and he’s a cuddle bug now.

As promised, here are the things I learned from the event I went to on Saturday.

I should note, however, that even though the event was not a success for me, I don’t regret doing it.  The fee I paid for the booth was a donation to PAWS/LA, an organization I’ve supported both financially and through volunteer work for many years now.  Furthermore, I did indeed learn some practical lessons from  which I definitely needed to learn.  Yeah, I wish I could’ve sold more jewelry, but overall I’m cool with what transpired.

So here are those lessons:

1)  Know your event – As it happens, I did know my event and that it was a definite possibility I wouldn’t sell much.  But what I didn’t figure into it was just how dog-oriented the event really was and how that would figure into not selling jewelry.

More than one person seemed surprised I was there at all, and some even asked what I was doing selling jewelry at this particular event.  I told them that I was a long-time supporter of PAWS/LA and this was a part of that support.  They also asked if I was selling jewelry for dogs, to which I said no (I generally don’t "believe" in dogs wearing things like jewelry or clothes, unless it’s for practical reasons like keeping them warm or safe in some way).


The picture above shows me holding the type of wares sold by most of the other vendors.  This is a doggie umbrella.  You can’t see it in the photo but there is a chain that hooks onto the dogs collar in the center of the umbrella.

Everyone had dogs with them.  Dogs don’t generally like shopping for jewelry.  A couple of dogs tried to jump up onto my table to see if I was giving out treats (like many of the other vendors were).  One dog knocked some necklaces down on the grass with his paw.  It’s no secret that I adore dogs, and none of this really bothered me, but it was painfully clear that this was not the event for me to sell loads of jewelry, dog-themed or not.  I did, however, get to engage in one of my favorite hobbies–petting dogs.

2)  Run through everything in advance.  Mick and I briefly practiced transactions, made sure the authorization process worked, etc.  I also set up my display in advance and I’m so glad I did.

3)  Think about the practicality of the price tags you use.  I made a big mistake here.  The tags I used were really big.  Sure, they were easy to read but they got hopelessly tangled together and with all the chains on the jewelry.  BIG PAIN IN BOOTY.  This also really hampered people in looking at the jewelry and made the whole process much more awkward than it had to be.

So what tags to use?  I’d use small plastic tags that can be easily cut off either by the purchaser or at the point of sale.  I’d probably stay away from adhesive tags since they can have a gummy residue which is annoying to remove.

4)  Pricing.  this is something I’m still very unsure about.  It’s so freakin’ hard to strike a balance between adaquately compensating yourself for your work and pricing your work so that customers will buy.  One of the problems is that as an independant craftsperson, it is impossible to compete with jewelry made overseas in factories for a fraction of what it costs to make my own jewelry.  That said, my feeling is that many of our pieces could’ve been overpriced, though I’m not sure.  In the future this is one of the areas that I will be looking at most closely.

5)  Understand that people have potential customers have a variety of tastes.  Not everyone is going to love your work, and not everyone is going to want to buy it.  But if you stay true to your own style and feel strongly about your work and talent, there will be other people who feel strongly about it as well.  Now if I could only find them!  😉